Showing posts with label Pattern-Mine. Show all posts

01 January 2024

Binary Blankie, colours and pattern

Happy New Year 🎆🎇

Colours.
I wrote about finger swatches the other day. Another thing I do is have a wee container of 12dc squares to play with. I've picked 8 colours out to do this blanky.
Warm: Tomato, Mustard, Fuchsia Purple, Boysenberry
Cool: Petrol, Bottle, Royal, Proper Purple
and I have chosen tomato and petrol for the first one.

Pattern.
I've been trying to decide what to do the squares as. I'm so over grannies now. 🥴
Choices... plain dc, work between dc's, a pretty square like something from Lucy's collection...

I think it needs to have even sized rows for the colour to work. I'm still going with the illusion of someone reading the binary so I'd like it to be clear.

I did a whole big blanket in the work between stitch and really liked it. It has quite a thick feel to the fabric and has a sort of waffle texture.
The other time I used this stitch was on Doris Chan's All Shawl, being triples it came out nice and lacy. I think I used it on a Lion Brand bag pattern too, now I think about it.

The pattern is here, for the big blanket I made.  
(Kaz works with Lucy to re-imagine her designs with each new colour pack. Check out all the pretty Harmony blankets!)
Here is the one I made.

I've done a chart for the squares - up to row 8 as that's what we need for this project.

In between stitch square pattern.
Row 1. Ch3, join with a slip stitch (JSS) to form a ring. Ch3, 2dc, (ch1, 3dc)x3, ch1. JSS. Turn. =12dc + 4ch
Row 2. Ch3, 1 dc in same space, *1dc in between the next st to the corner ch, 2dc, ch1, 2dc in the corner ch * Rep ** 4 times, omitting the last 2dc of corner at the end. JSS. Turn. = 24dc + 4 ch
Row 3. Ch3, 1 dc in same space, *1dc in between the next st to the corner ch, 2dc, ch1, 2dc in the corner ch * Rep ** 4 times, omitting the last 2dc of corner at the end. JSS. Turn. = 36dc + 4ch.
Carry on like that for 8 rows total (for this project) in the colours as per the binary code.

I used a 5mm hook with Stylecraft special DK.

22 October 2023

Goldilocks bags!

Yup, that's right, BAGS!

First up I used the round Goldilocks to make a half round bag.
 
Making just half the circle until it was wide enough, then switching to straight rows across the top for a wee bit more height. 

Then I made a meshy style bag in black. I used an 8mm hook here to get a loose mesh.
I started with the round pattern for 6 rows and then continued on with no increase (ie the straight pattern)

 
Here it's flat and here stuffed full with my favourite big blankie.

For a bigger market style bag (on the to do list!) I'll try going to 9 round rows first and see how that turns out.

SO many options!


Links:
Blanket patterns Ravelry
Previous posts start here

02 October 2023

Square

 Oh, one more then.

Here is the Square version. I love options!


Once again with the Stylecraft! and a 5.5mm hook now. That gives a lovely drape.

Here is the colour sequence if you wanted to follow along.
(Only I stopped at row 36- Shhh!)
1-15 is the palette.

Pattern is available here on Ravelry, with the Round and Straight ones.

Straight on with it

Well that circle was FUN!

What else can I make with that little 3 row repeat...🤔

How about straight rows to start with.

I had some Stylecraft left over from the Lucy's Harbour ripple blanket
so I've used that for this blanket.
 

I had a 5mm hook for this one, but I think a 5.5mm would be nice too.

Pattern:

Stitches:

V = dc, ch1, dc in st/sp indicated.

Sp = space

Ch = chain stitch

Dc = double crochet

St = stitch 

Fdc - foundation double crochet - see below pattern

(= ||-V-V) etc. are little visual pictorials of the row


Pattern:

Fdc 151  (or any multiples of 3+1)


1. Ch3, dc in next st, skip 1st, *(V in next st, skip 2 st) until 4 remain, V in next st, skip 1st, 1dc in last 2 st. Turn

= ||-V--V--V……V--V--V-||


2. Ch3, dc in next st, 3dc in next ch space across, 1dc in last 2 st. Turn

= || \|/ \|/ \|/…….\|/ \|/ \|/ ||


3. Ch3, 1dc in each dc to end. Turn

= |||||||||||......|||||||||||


And repeat those 3 rows!


The pattern is available with the Round, and Square here on Ravelry.


01 October 2023

More on Spring and Autumn. The Goldilocks Circle.

This is the latest circle blanket I have made from my Goldilocks pattern.

I used the box of yarns in the last post, which are:


Raspberry, Khaki, Denim, Lime, Mocha,
Gingerbread, Petrol, Meadow, Walnut, Grape, 
Graphite, Gold, Violet, Cypress, Copper.

I'm calling this palette Spring and Autumn. Pretty spring flowers and dried leaves.


Here is the stripe sequence If you want to follow along.

I've run through the 15 colours and then fiddled with the order a little on the second run. Then on the third run through I managed to miss the graphite and got very confused toward the end when I seem to be one colour short. After an age I figured it out!


This one is 1.25m wide and uses about 450g yarn in total.
Which leaves plenty of yarn left for the next one.

Scroll on for the next Goldilocks - The Square!

Goldilocks, in the beginning...The Circle.

 Welcome to the Goldilocks Obsession!

I started working on this design years ago, I'm not sure why it got put aside - it's so versatile!

First came the circle.

History.
I wanted to make a blanket. Nice. 
I thought - Circle - Great!
Then.... But not that one, not that one, nah, nope, scroll on...
Too hard, too easy, too boring, too finickity!

Eventually I came up with a design I liked. Not too hard, not too easy. Just right!
Hence the name.🧸🧸🧸.

These are all done in Stylecraft Special DK, my go to blanket yarn.

Pictures.
Number 1.


I did this one in a rainbow of colours (that bottle green in the middle is a bit jarring!)
and i used a 5mm hook for this one. I have decided now that 5.5 gives a better drape and so have that in the pattern.

After that one I doubled down, well I doubled the yarn and used an 10mm hook to make a big chunky one!

Number 2.

With these two, I used each colour for the 3 row sets. For the next one I changed colour each row. I think I like the effect better.

Here is the last circle, I just made from the box of yarns in the last post. 
I'm calling this palette Spring and Autumn. Pretty spring flowers and dried leaves.

Number 3.


This one is 1.25m wide and uses about 450g yarn. 
I'll start a new post to go into more detail.


Pattern is available here on Ravelry.

Other Goldilocks Posts


10 August 2023

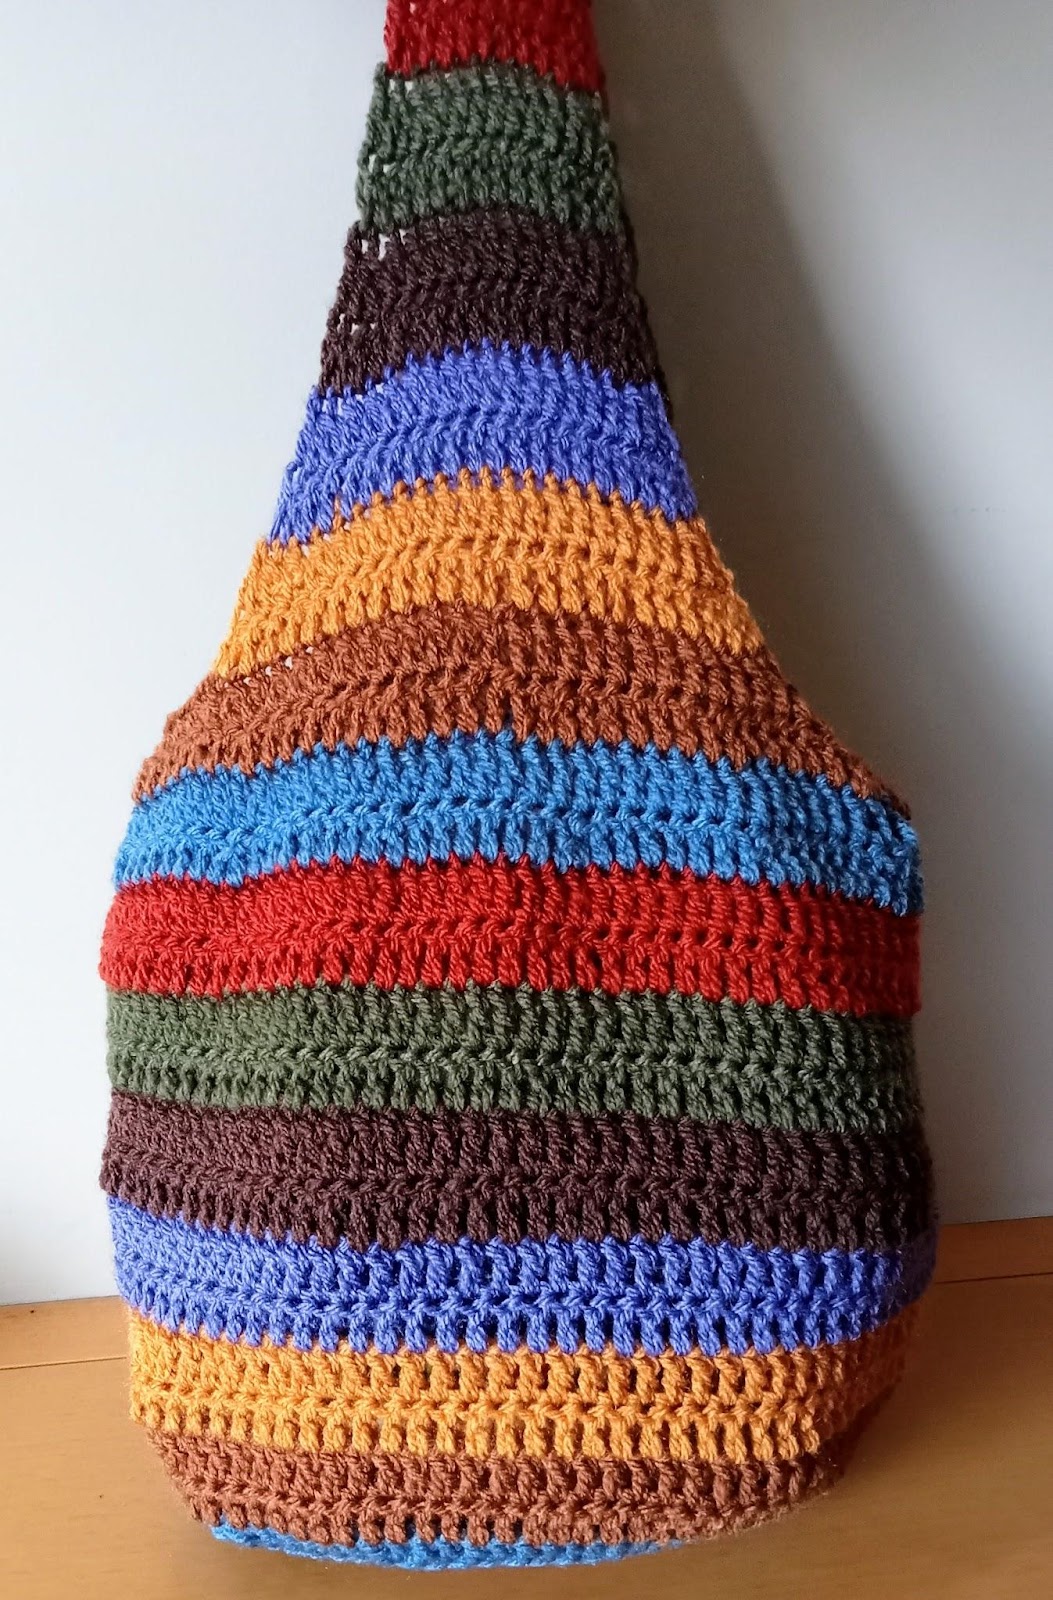
Hobo Bag

 My favourite Hobo Bag


I know, I know, there are lots of lovely slouchy hobo bucket bags around.

And here is mine!

It's the one I make again and again.

The bag part is about 30cm x 30cm flat plus handle/strap, but will stretch out to nearly 40cm!

What you need:

4mm hook

Hand bag: 75g Stylecraft Special DK 

Cross body bag: 85g Stylecraft Special DK


Link to PDF on Ravelry.


Pattern:

Start: Ch3, join with slip stitch (JSS) to form a ring. You can also use a magic circle but I prefer the more sturdy chain ring start for a bag.

Row 1. Ch3, 11dc into ring, JSS, turn. = 12 stitches

Row 2. Ch3, dc in same stitch, 2dc in each stitch around, JSS, turn. = 24 stitches

Row 3. Ch3, dc in same stitch, (1dc in next stitch, 2dc in next stitch)x 11, 1dc in last stitch, JSS, turn. = 36 stitches

Row 4. Ch3, dc in same stitch, (1dc in next 2 stitches, 2dc in next stitch)x 11, 1dc in 2 remaining stitches, JSS, turn. = 48 stitches

Row 5. Ch3, dc in same stitch, (1dc in next 3 stitches, 2dc in next stitch)x 11, 1dc in 3 remaining stitches, JSS, turn. = 60 stitches

Row 6. Ch3, dc in same stitch, (1dc in next 4 stitches, 2dc in next stitch)x 11, 1dc in 4 remaining stitches, JSS, turn. = 72 stitches

Row 7. Ch3, dc in same stitch, (1dc in next 5 stitches, 2dc in next stitch)x 11, 1dc in 5 remaining stitches, JSS, turn. = 84 stitches

Row 8. Ch3, dc in same stitch, (1dc in next 6 stitches, 2dc in next stitch)x 11, 1dc in 6 remaining stitches, JSS, turn. = 96 stitches


Row 9-20. Ch3, dc in next stitch all around, JSS, turn. = 96 stitches


Row 21. Ch3, dc in next 5 stitches, 2dc together, (1dc in next 6 stitches, 2dc together)x 11, JSS, turn. = 84 stitches

Row 22. Ch3, dc in next stitch all around, JSS, turn. = 84 stitches


Row 23. Ch3, dc in next 4 stitches, 2dc together, (1dc in next 5 stitches, 2dc together)x 11, JSS, turn. = 72 stitches

Row 24. Ch3, dc in next stitch all around, JSS, turn. = 72 stitches

Split for handles:

Row 25. Ch3, 2dc 2 together, 1dc in next 20 stitches,  2dc 2 together, 1dc, turn leaving remaining stitches unworked (for now) = 24 stitches.

Row 26. Ch3, 2dc 2 together, 1dc in next 18 stitches, 2dc 2 together, 1dc, turn = 22 stitches

Row 27. Ch3, 2dc 2 together, 1dc in next 16 stitches, 2dc 2 together, 1dc, turn = 20 stitches

Row 28. Ch3, 2dc 2 together, 1dc in next 14 stitches, 2dc 2 together, 1dc, turn = 18 stitches

Row 29. Ch3, 2dc 2 together, 1dc in next 12 stitches, 2dc 2 together, 1dc, turn = 16 stitches

Row 30. Ch3, 2dc 2 together, 1dc in next 10 stitches, 2dc 2 together, 1dc, turn = 14 stitches


Row 31. Ch3, 1dc in next stitch across, turn = 14 stitches. 

Row 32. Ch3, 2dc 2 together, 1dc in next 8 stitches, 2dc 2 together, 1dc, turn = 12 stitches 

Row 33. Ch3, 1dc in next stitch across, turn = 12 stitches. 

Row 34. Ch3, 2dc 2 together, 1dc in next 6 stitches, 2dc 2 together, 1dc, turn = 10 stitches


Hand bag:

Row 35-38. Ch3, 1dc in next stitch across, turn = 10 stitches. 

Fasten off.


Shoulder bag:

Row 35-55 (approx). Ch3, 1dc in next stitch across, turn = 10 stitches. 

Fasten off.


Crossbody bag:

Row 35- 65 (approx). Ch3, 1dc in remaining stitches, turn = 10 stitches

Fasten off.


Second side:

Go back to row 24 and skipping 10 stitches, reattach yarn. Work rows 25- 38, 55 or 65 as before.

Before you fasten off the second side slip stitch the 2 handles together taking care not to twist them!

If you want to try it out for size before you cut the yarn, be sure to give it a good hard stretch before you measure, or load it up and try it on. It can be alarmingly stretchy!


Job done!


Making it a different size:

To make it wider or narrower; work more or less of the increase rows.

To make it longer or shorter; work more of less of the straight rows.

You can change to a smaller hook to make a tighter thicker fabric or a bigger hook to make a looser, more net like fabric.


Remember: it’s crochet, it will stretch!

Which I think is really the whole point of a good crochet hobo bag.  ðŸ˜‰


Let's see how much I can shove in it…

Yup, that’s 6 full balls of Stylecraft Special dk 100g to fill it right up.


Bonus pouch:

Row 1. Ch 24 + 3 for turning = 27ch.

Row 2. Dc in forth ch and along to end, turn and work down the other side of chain, JSS, = 48 stitches.

Row 3- 15. Ch3, dc in each stitch around, JSS. = 48 stitches.

Fasten off. Add a zipper or a button closure if desired.


You can either sew this on, leave it loose in the bag or clip it on so you can move it between bags if you have more than one that you use.

I tried velcro, putting the scratchy part on the pocket and the fluffy part on the bag. That way if I wasn’t using the pocket the bag didn't have a nasty scratchy patch on it!


18 June 2023

Squishy Bear

 Squishy Bear.

It has a name!

See previous posts for the evolution of this squishy snuggler. 

Post 1: design phase

Post 2: better bears and lots of photos

Here is the pattern in brief and you can get it with construction photos from Ravelry.


Eyes.
I like the look of button eyes and feel they are easier to secure than so called safety eyes. Especially here where we use hdc stitches. The safety eyes would be very easy to wiggle out.
I use 2 separate pieces of yarn to attach each eye and knot each one, so even an avid chewer would have to get through both bits to get the thing off.  
And it's acrylic - that ain't a nice chew!
Alternatively, you can make a crocheted eye, with 8hdc in a magic circle and sew on. So that's a nice soft eye.
I did that on Raspberry Squish.


If you want the full pattern with photos and explainers:
Buy now from Ravelry